How To Fill In Procreate – Solid Colors & Gradients
Procreate is a fantastic tool for creating beautiful designs, but it can be challenging to figure out how to fill in Procreate at times. If you want to improve your skills with Procreate, these tips will help you master the art of filling in shapes.
Procreate is a capable drawing app for the iPad and iPhone. It allows you to draw directly on photos and other images, and it has some incredible features like layers, filters, and text tools. However, if you’re unfamiliar with the app, it can sometimes feel a little mysterious. This post will teach you how to color fill in Procreate to use it more effectively.
As with many other things, there are several ways to fill out specific fields in Procreate. We demonstrate some of the best ways to color fill in Procreate.
Fill A Shape In Procreate – Method 1
The first method we’ll go over is the simplest way how to fill in Procreate and one of the most popular among beginners. The concept behind this method is straightforward: You need to add a new layer. Then place an object on top of the shape layer. Method 1 on how to fill in Procreate:
Step 1:
Open the Procreate file in which you want to fill in the shapes.
Step 2:
Create a new layer.
Step 3:
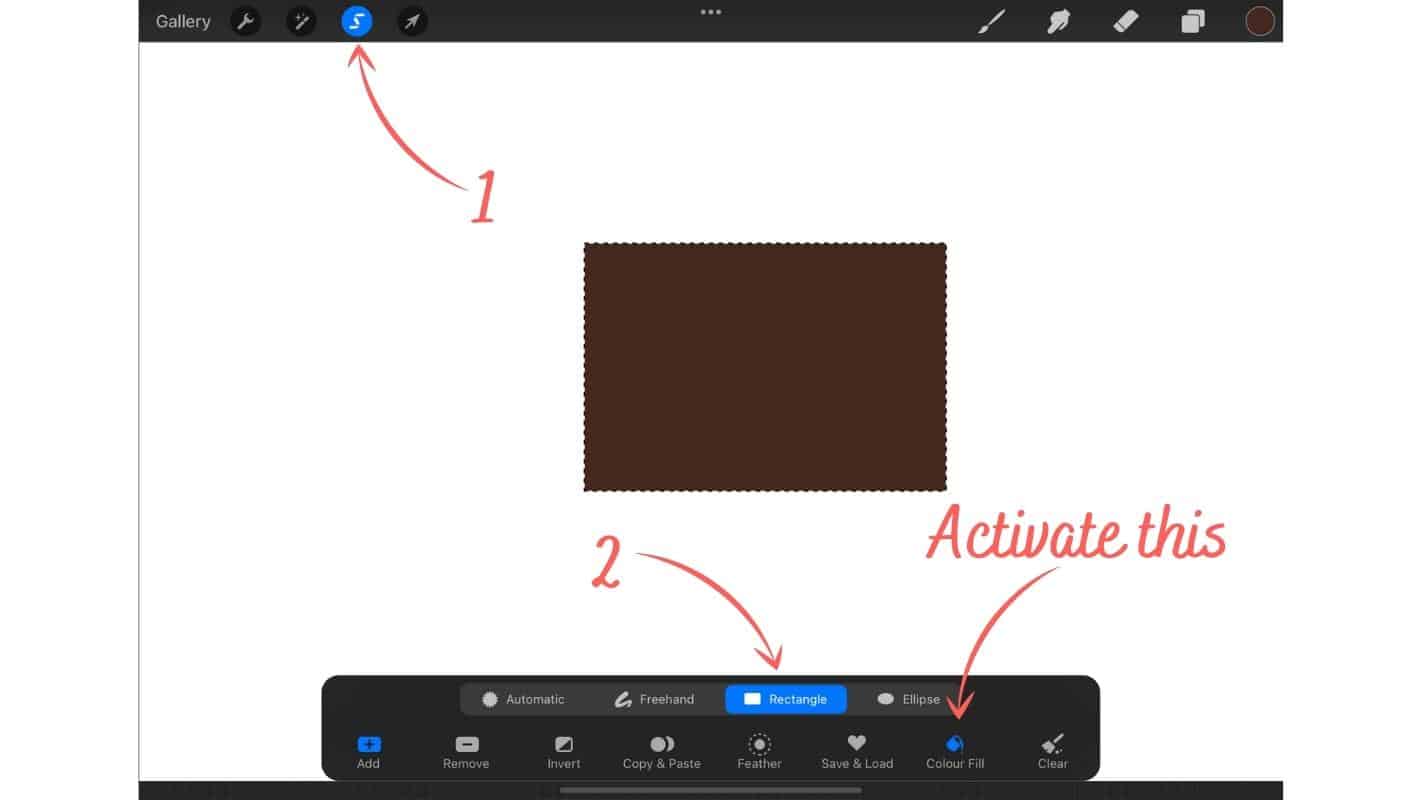
Make a shape. Tap the “S” symbol in the top bar to do so. This activates the shape menu, from which you can draw rectangles, eclipses, or freehand forms. Choose the type of shape you want to draw and click on it.
Step 4:
The quickest way to fill in a shape or form is to select “Color Fill” from the bottom menu. First, make sure you have a color chosen on the top right, then click “Color Fill.”
Step 5:
Draw the rectangle, eclipse, or freehand form by tapping and holding. The shape will be drawn into the layer and filled with the color you selected when you release it.
Step 6:
To add more shapes to the layer, draw a new shape and tap “Add” on the bottom left. If you choose color fill, the shape will be filled in automatically.
It is critical that there are no gaps in the shape outline. You fill in the entire canvas if the lines aren’t completely joined.
Fill A Shape In Procreate – Method 2
This second method gives you a lot more say over what happens. The idea is, to begin with, a blank canvas and then draw in the shape you want to fill in. You can use this method to fill in a shape after you’ve drawn it. This is extremely useful if you have a lot going on in your project. Method 1’s steps one through three are similar to them. So, here is method 2 for how to fill in color on Procreate:
Step 1: Open the Procreate file in which you want to fill in the shapes.
Step 2: Create a new layer and only fill in the new layer.
Step 3: Make a shape. Tap the “S” symbol in the top bar to do so. This activates the shape menu, from which you can draw rectangles, eclipses, or freehand forms. Choose the type of shape you want to draw and click on it.
Deactivate the “Color Fill” option for the time being.
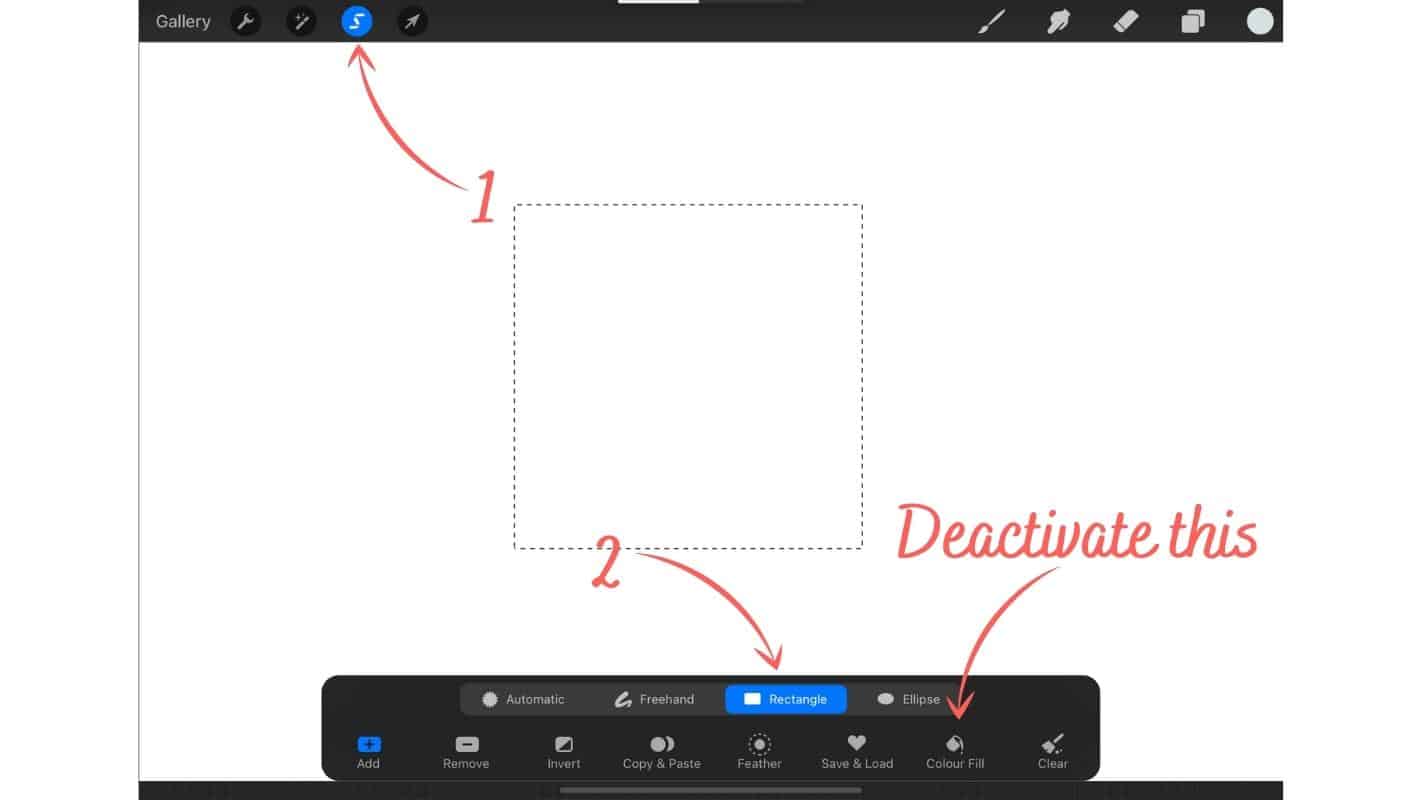
Step 4: Draw the rectangle, eclipse, or freehand form by tapping and holding. Again, the shape will be drawn into the layer once you release it. And this time, the shape is not colored in.
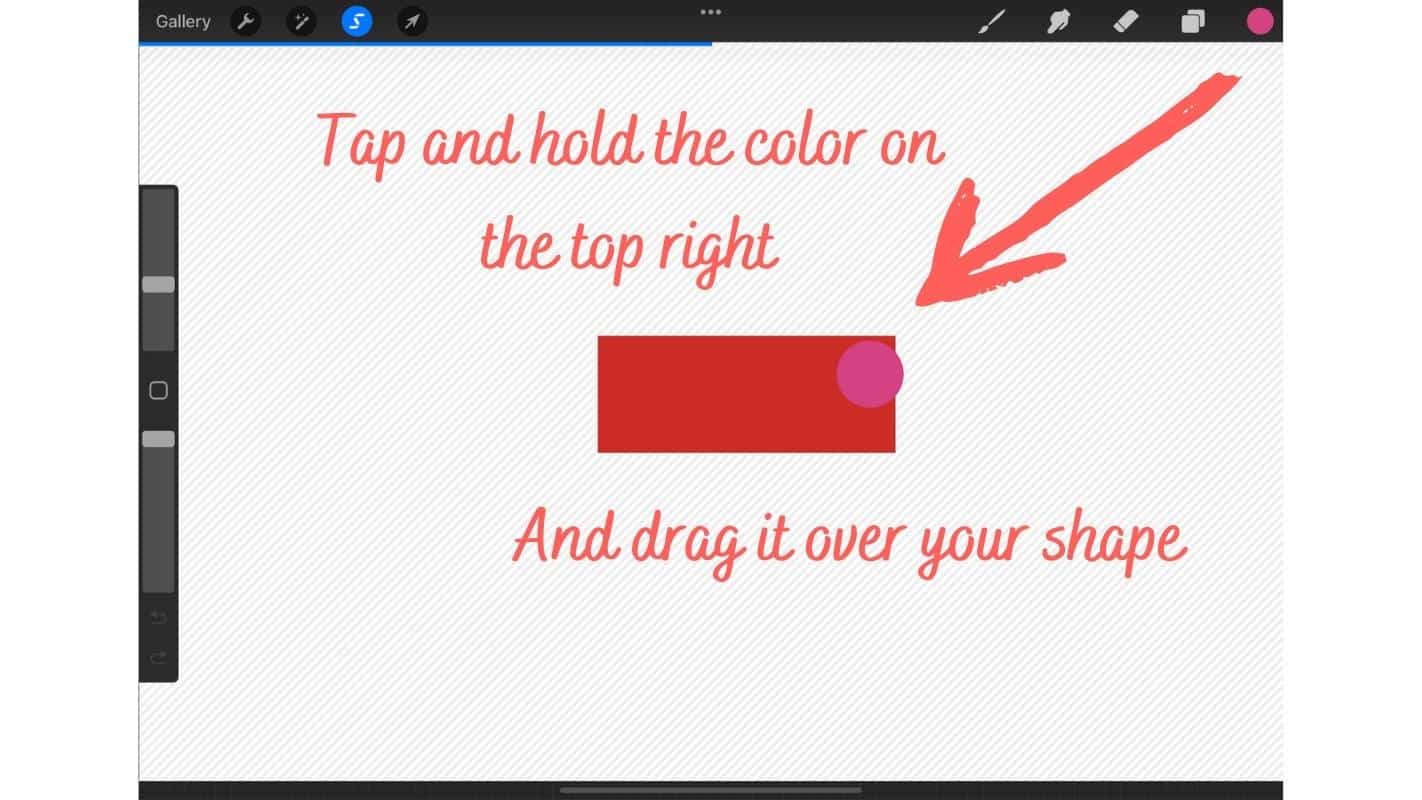
Step 5: Tap and hold the color panel in the top right corner, then drag it over the shape you want to fill in Procreate. The form is now filled with the color you selected in the top-right color panel.
It is critical that there are no gaps in the shape outline. You fill in the entire canvas if the lines aren’t completely joined.
Fill A Shape In Procreate – Method 3
Method 3 on how to fill in Procreate is very similar to Method 2. We’re filling in the shape after drawing it in on our canvas. Make sure you have a shape for each layer, or you’ll end up filling every shape in the same layer. Steps one through four are identical to those in method 2, so follow these steps above and step 5 for method 3. Method 3 on how to fill in Procreate:
Steps 1–4: These are the same steps as in Method 2.
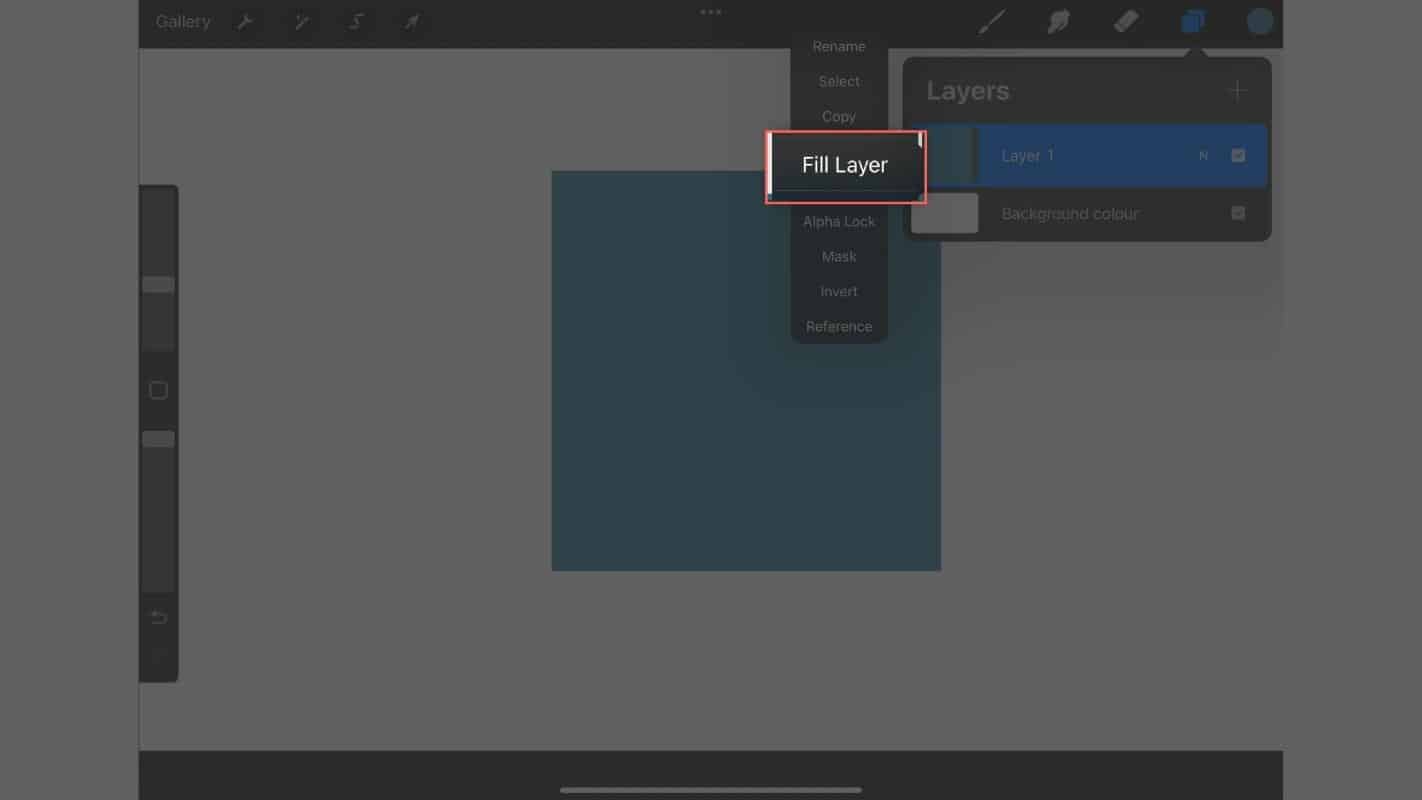
Step 5: You now have your shape in your canvas. On the top right, open the layer options menu. Then, on the layer where you’ve drawn your shape, click. Then click “Fill Layer,” and your layer is colored.
Personally, I never use this method in my workflow, but there you have it: three ways to fill your shapes with a solid color! It is critical that there are no gaps in the shape outline. You fill in the entire canvas if the lines aren’t completely joined.
But what if you want to add a nice, warm gradient to your shapes? Of course, Procreate can do this as well! Here’s how you do it:
Fill A Shape With Gradients In Procreate
Filling in gradients in Procreate is a little more complex than filling in solid color. However, the method used here is excellent because it gives you complete control over the appearance of the fill. Furthermore, gradients are looking really cool these days! So, method 4 for how to fill in Procreate, but this time with a gradient:
Step 1: The first step is to make a gradient. Visit our article on how to create a gradient in Procreate. There, follow these steps. Return here once you’ve finished. In our arsenal, we continue to use a gradient. Make sure your gradient is all in one layer and ready to go.
Suggested Reading: How To Make A Gradient In Procreate – Easy Step-by-Step Guide
Step 2: Create a new layer and draw in the desired shape.
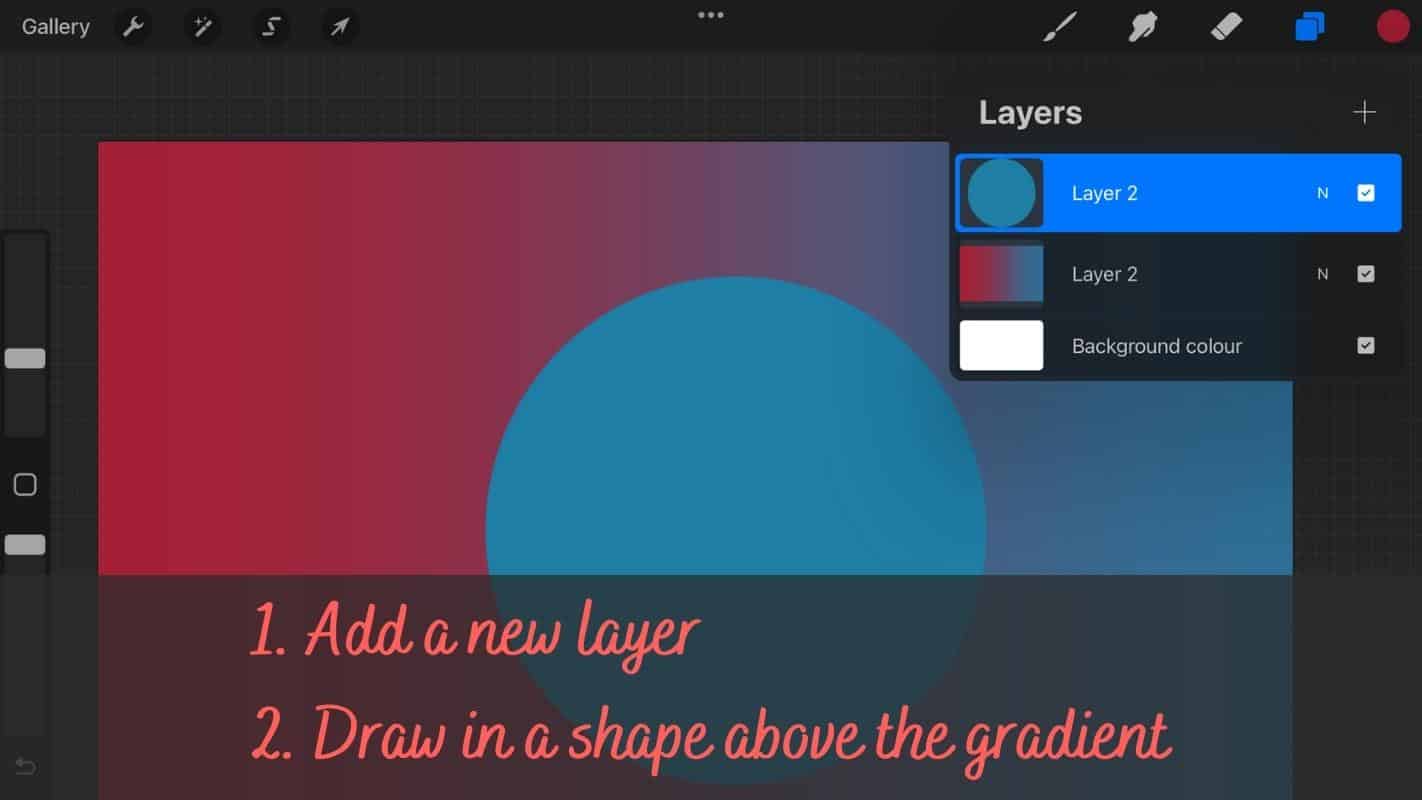
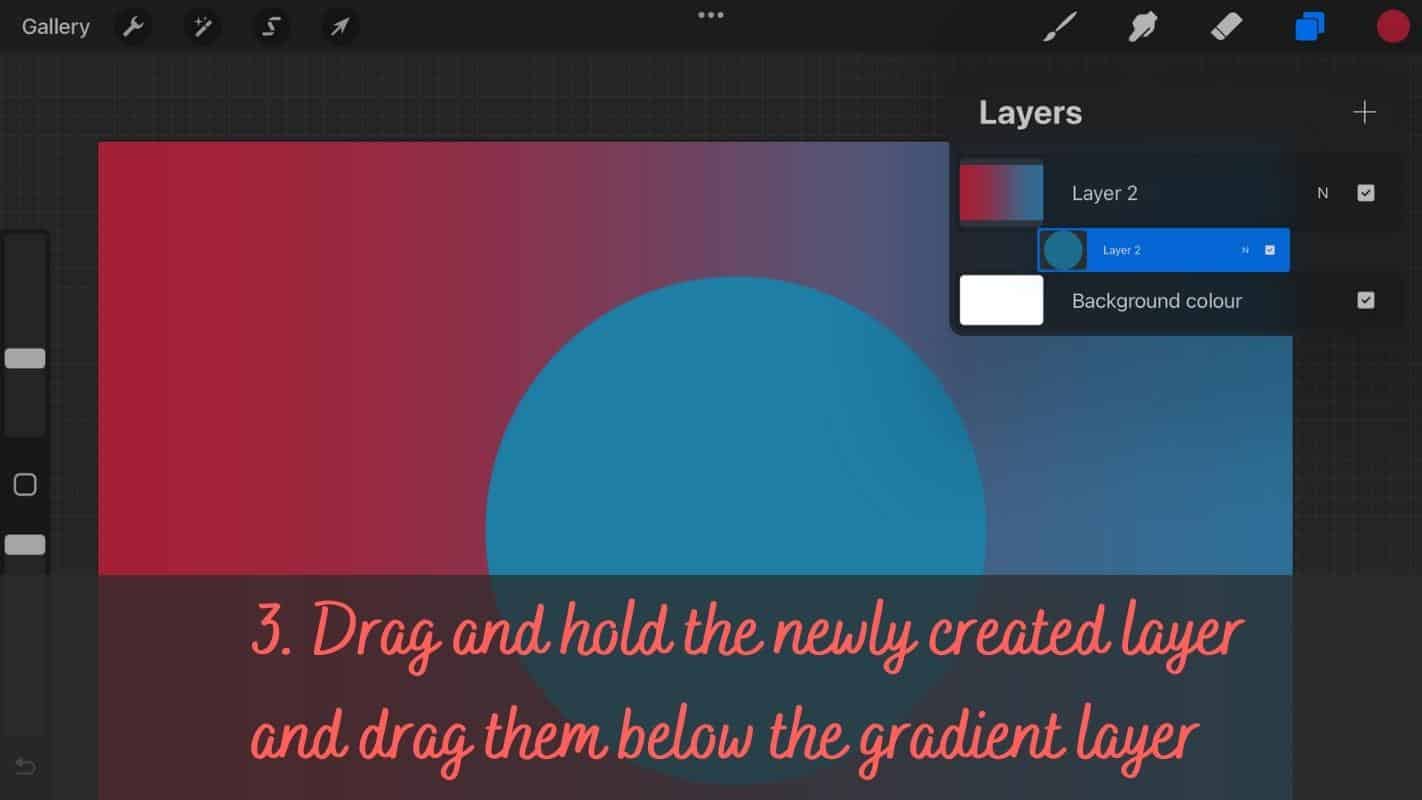
Step 3: Open the layer panel in the upper right corner. Then drag and drop the layer with the shape you just created beneath the layer with the gradient color.
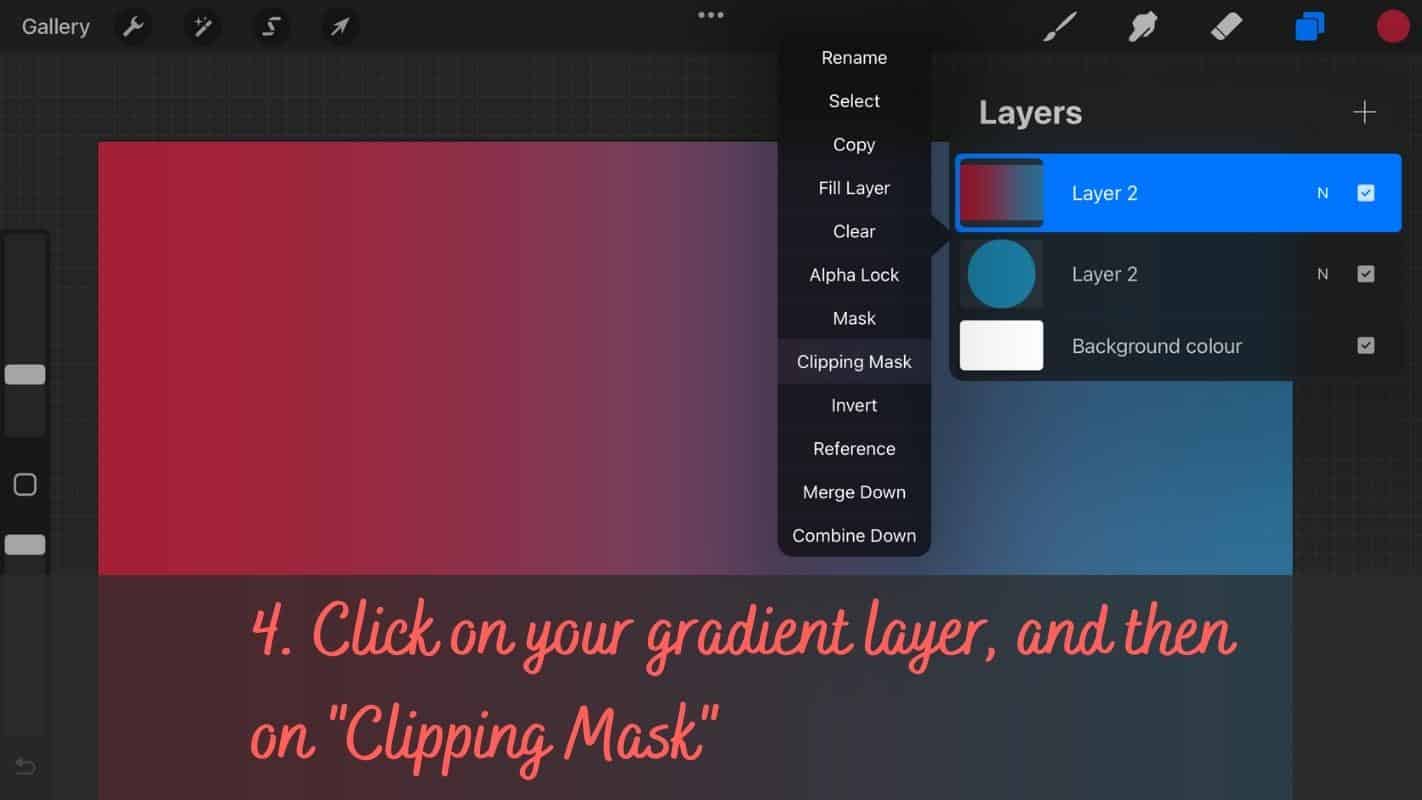
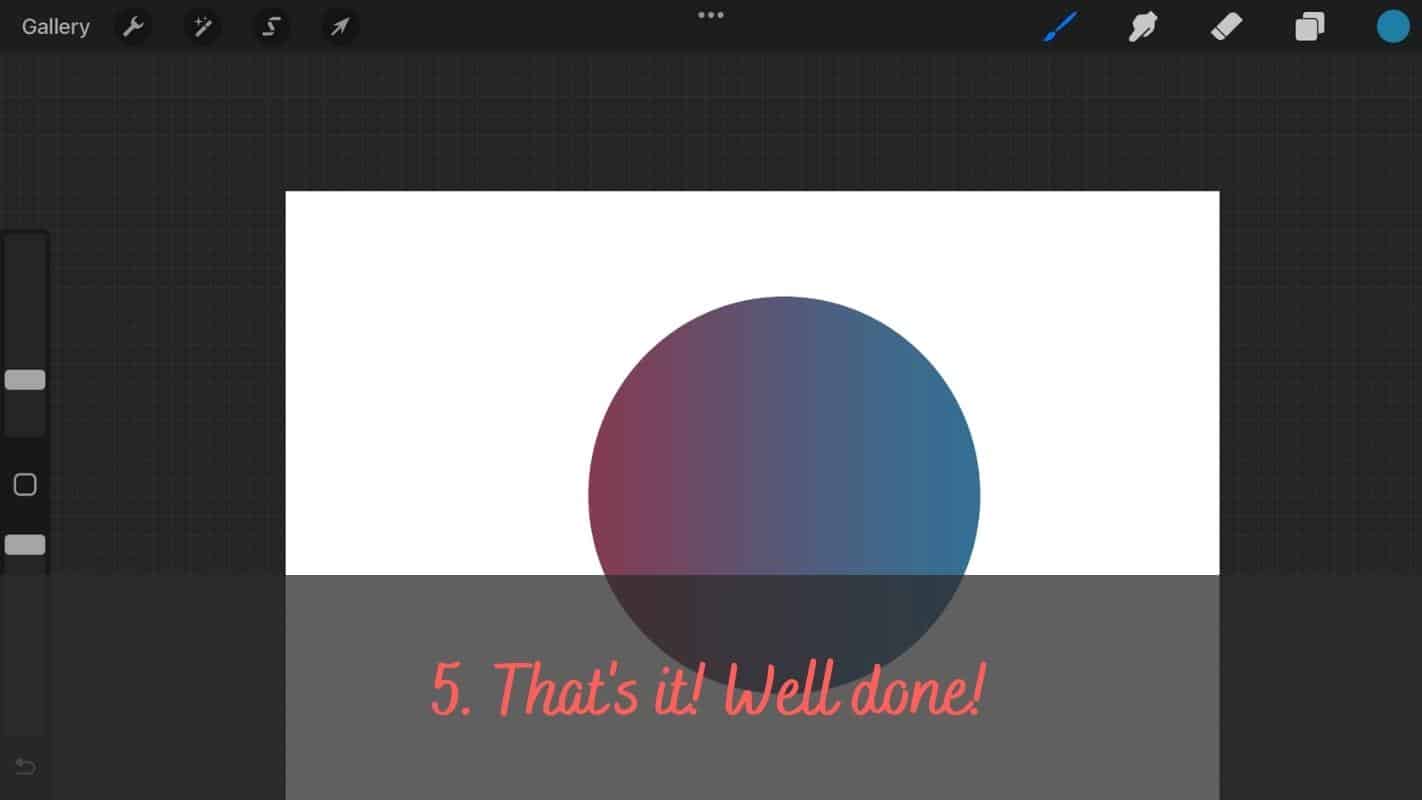
Step 4: You’re still in the layer panel. Tap the gradient color layer, then choose “Create Clipping Mask.” And your shape is now filled with the gradient you created!
This is how you use gradients to fill shapes. Congratulations!
That’s all there is to it for how to fill in Procreate. It’s pretty simple once you know what to do. Follow these steps, and you’ll get fantastic results. Experiment with all of the methods to see which one works best for you, or consider taking some Procreate classes to improve your skills further. Return to this site if you require assistance.
Of course, once you’ve filled in the color you want, make sure to soften the edge or add some grain to make it look beautiful.
More Procreate Tutorials
Your journey through Procreate’s features is just the beginning. To discover the full capabilities of this amazing app, visit our main Procreate tutorials page. It’s a treasure chest of knowledge, brimming with guides that cover every aspect of Procreate.
This comprehensive collection is your one-stop destination for all things Procreate. Here, you’ll find tutorials that cater to all levels, helping you elevate your digital art and explore new creative possibilities.
That’s it with my article for today about how to fill in Procreate! Thanks for reading,
Lilly-Mai
More Procreate Tutorials:
Sources:
Share with your Friends:
