How To Crop In Procreate – The Only Tutorial You Need
In my early days in Procreate, I had several questions about Procreate and one of them was how to crop in Procreate. The reason I asked that question was that I couldn’t find a button or a crop tool in the app. But, there is a way to crop in Procreate and it’s very easy. And I promise you don’t have to read or watch any other tutorials once you’ve read this article.
Short in Time?
Jump to my short explanation of how to crop in Procreate the fastest way possible.
Procreate has become the number one choice for most professional illustrators and designers, who use iPad Pro as their main drawing device. The app has a lot of features that are useful for creating digital artworks, including layers, filters, and brushes. I have been using Procreate for almost three years now, and I have to say that it’s the best app available for creating digital artworks on iPad.
In this tutorial, I will show you how to crop in Procreate in a few easy steps. I will explain in simple steps with detailed images several methods on how to crop in Procreate, like how to freehand crop in Procreate, how to crop around an image in Procreate, and more.
In the end, I answer some of the most frequently asked questions about Procreate that I get from emails. Maybe you asked some of these questions yourself and the answers will help you.
How To Crop In Procreate – The Fastest And Best Way
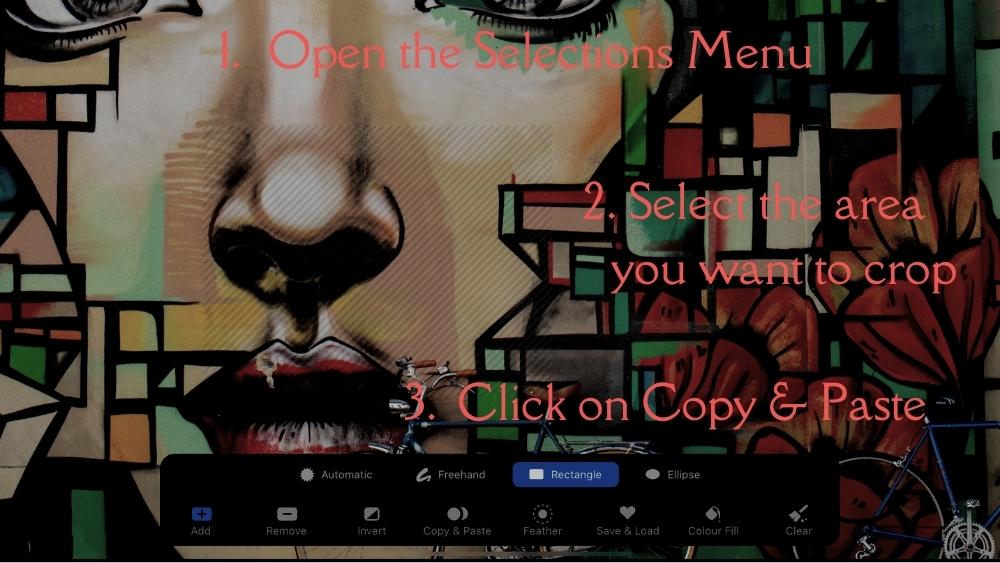
I show you the fastest and best way to crop anything and in every possible shape and form. These are the steps for the best way to crop in Procreate:
1. Open the selections menu by clicking on the S on the top left.
2. Select an area you like to crop, you can either choose freehand, rectangle, or eclipse to do this. It’s important that Color Fill is deactivated, or else this won’t work.
3. Once you have the area selected, click on Copy & Paste. Procreate makes a new layer only with the selected area.
That’s it. How easy can it be once you know what to do? You never need any other tutorial again in order to crop in Procreate! However, I have some more goodies for you. Just read on if you want to know more about how to crop in Procreate.
How To Crop An Image In Procreate
There are several methods on how to crop a photo in Procreate. But I’m going to show you most easy and fastest way.
1. Go to the desired photo and open it.
2. Click the S in the top left to display the selections menu.
3. Choose the area you want to crop from the options of freehand, rectangle, or eclipse. It’s important here that the Color Fill is not activated, otherwise, this method doesn’t work.
4. Click on Copy & Paste after you have the area selected. Only the portion of the image that is selected in Procreate creates a new layer.
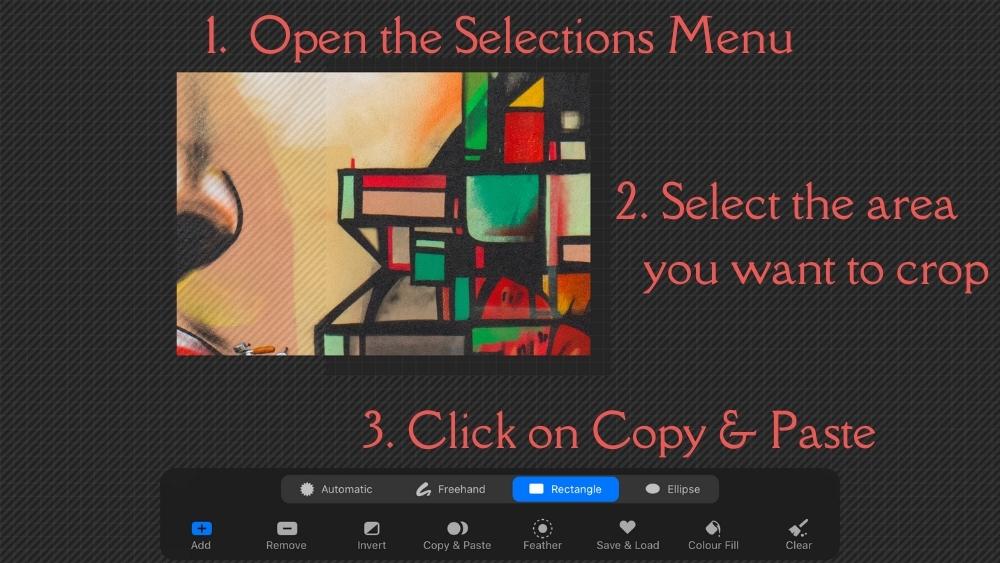
This is how to crop an image in Procreate. You can either crop the image with a rectangle, freehand, or eclipse. The results are amazing and it’s lightning-fast to crop this way in Procreate. But there’s more. Let us cover other things, like how to crop a layer in Procreate. But first, how to freehand crop in Procreate:
How To Freehand Crop In Procreate
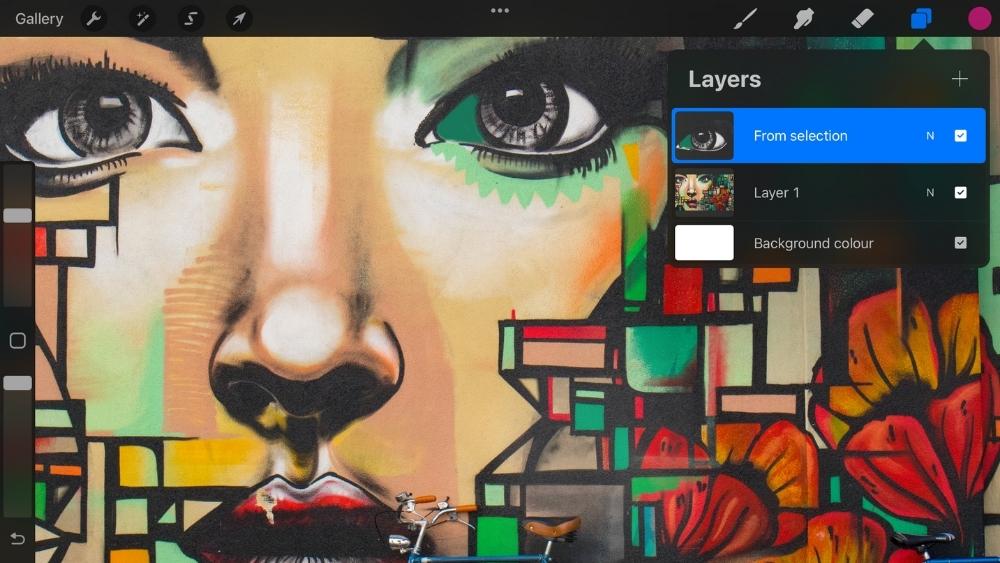
But, how to freehand crop in Procreate? The short answer: It’s exactly like the other two steps above. The only difference is, that you select Freehand after you opened the selection menu. And you proceed like the other steps; select an area and then hit the Copy & Paste button.
The image below shows what the result is. In this example, I selected the eye from the graffiti with the freehand option, then I pressed Copy & Paste and Procreate created a new layer with the selected area. This is how to freehand crop in Procreate.
How To Crop Around An Image In Procreate
This is all nice and good Lilly-Mai, but how to crop around an image in Procreate? I’ll explain it to you. The approach is almost the same, but with a little tweak. So, follow the steps outlined above:
1. Open your image or your project in Procreate
2. Click on the S on the top left, this opens up the selection menu
3. Select either freehand, rectangle or eclipse, and select the area you want to crop.
4. And then hit the Invert button. Procreate inverts the selection and now marks everything except the area you selected in step 3.
5. Proceed like above, by clicking on Copy & Paste and let Procreate do its magic!
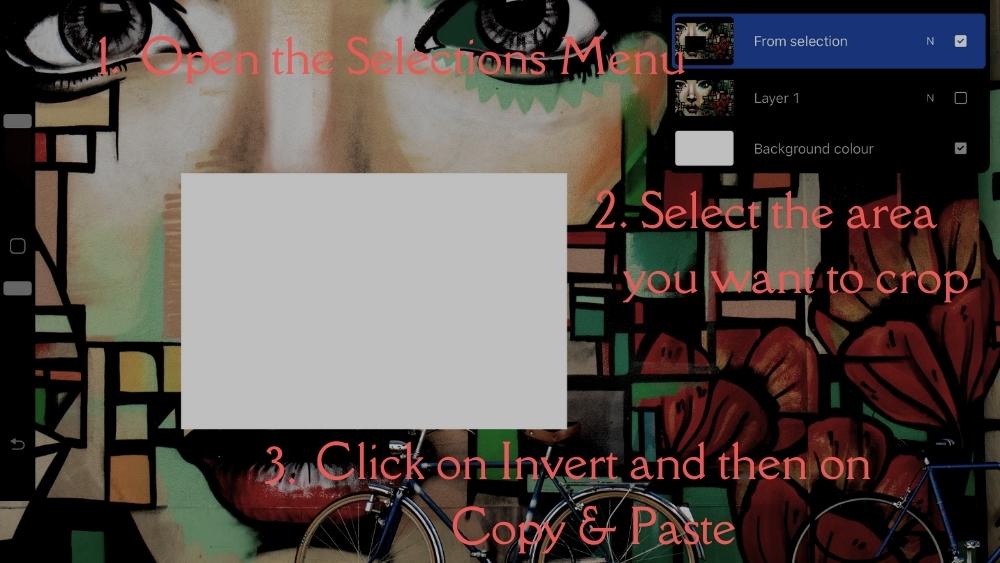
There you have it, how to crop around an image in Procreate. Simple and easy once you know what to do! As I said, the approach is basically the same as on the point above like how to freehand crop in Procreate or how to crop in Procreate. Let’s move on!
How To Crop the Whole Canvas In Procreate
Cropping a canvas in Procreate is easy, and I show you how to crop the entire canvas in Procreate in a few simple steps. It’s a bit different than the other methods I’ve shown in this article. However, it’s totally possible to crop the canvas with the steps mentioned above. Nevertheless, here is how you crop the canvas in Procreate:
1. Select the Actions menu, this is the wrench
2. Click on Canvas
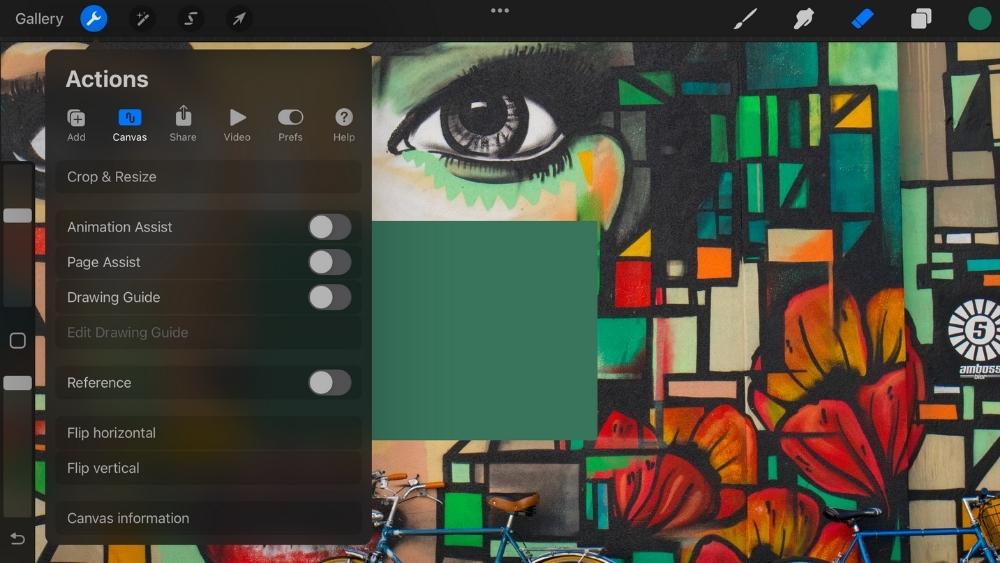
3. You are ready to crop and resize your whole Canvas
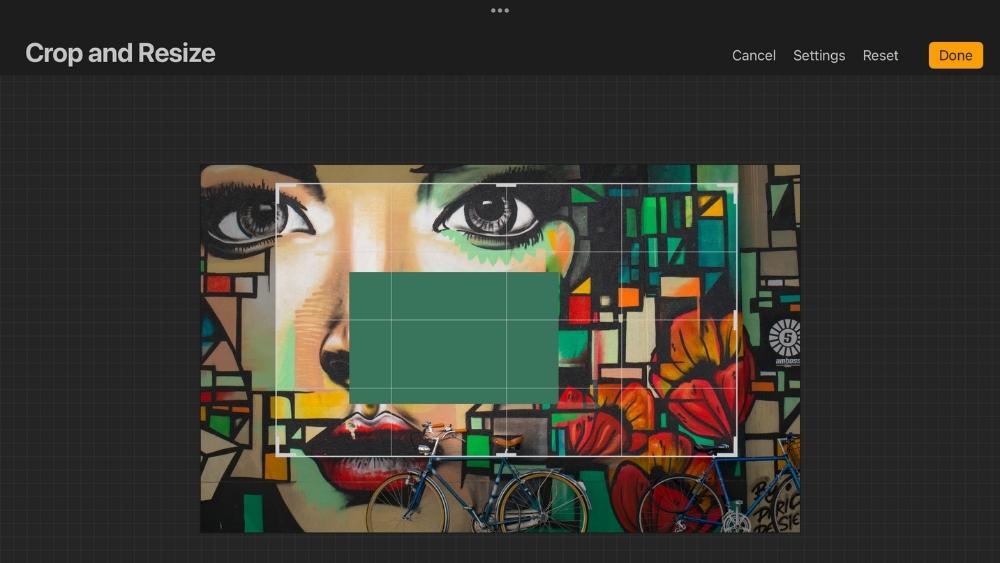
These are the steps on how to crop the whole canvas. You know now everything about cropping in Procreate! With this said, let’s go over some of the most asked questions.
Frequently Asked Questions
How To Cut Out A Picture In Procreate
Just follow the steps outlined above on how to crop an image in Procreate. I’ll explain everything in detail there. For a short summary of how to cut out a picture in Procreate follow these steps:
1. Open the select menu
2. Select the area you want to crop
3. Hit the Copy & Paste button
How To Crop A Layer In Procreate
Cropping a layer follows the exact same steps as the step with How To Crop In Procreate – The Fastest And Best Way. You can follow these steps to crop a layer in Procreate. However, here is a short explanation:
1. Access the menu selection
2. Chose the region you wish to crop
3. Select Copy & Paste
How To Crop Images In A Circle In Procreate
Cropping images in a circle in Procreate is as easy as the other parts in this tutorial. Follow the steps outlined above, but make sure to select eclipse in the selection menu. And then, for making perfect circles, tap and hold with one finger on your iPad. Procreate makes a perfect circle with the eclipse tool.
More Procreate Tutorials
Enhance your Procreate skills further by exploring our main Procreate tutorials page. This hub of Procreate knowledge offers a wide range of guides, covering everything from the basics to the most intricate features of the app.
Whether you’re refining your technique or exploring new creative ideas, our tutorials provide the guidance and inspiration you need. Dive into our comprehensive collection and take your Procreate skills to the next level.
Conclusion
I hope this tutorial helped you out in learning how to crop images in Procreate. It’s one of the most important things when it comes to digital art. Procreate makes it so easy that even a beginner can learn how to crop images.
When learning new things in Procreate, it’s important to keep in mind that cropping is a fundamental skill that can be used in multiple ways. Cropping is like a blank canvas where you can change the angle, size, or placement of your image in order to highlight different aspects of your photo.
So, with this said, I hope you learned something in this tutorial on how to crop in Procreate! Thanks for reading,
Lilly-Mai
More Procreate Tutorials:
Sources:
Share with your Friends:

