How To Merge Layers in Procreate: The Ultimate Guide
How to merge layers in Procreate was one of the first questions I asked almost 4 years ago. Procreate is an incredible painting and drawing app for iPad. It has everything you need to produce high-quality paintings and drawings. It has a great painting engine, various drawing options, and plenty of brushes and pencils.
However, as a digital artist, if you’re looking to expand your Procreate skills, you’ll need to know how to use the app’s hidden features. You can easily increase your painting speed and produce more detailed work by merging layers. This article covers everything you need to know about how to merge layers in Procreate.
What Are Layers?
Layers are the building blocks of any good drawing app. They let you organize and edit your artwork by grouping similar elements together. The bottom layer is the “Background” layer, which contains the colors and tones used as a base for your drawing. You can change the color and opacity of the Background layer to produce different colors and shades in your drawing.
What Is Merging Layers?
Merging layers means combining two or more layers into one single layer. This is useful when you want to combine all your Foreground objects into one single layer or hide part of your background by combining it with a Layer Mask. How to merge layers in Procreate is easy and we show you exactly how it’s done later in this article.
Any blending mode will be applied to the pixels below when layers are merged. It’ll also ignore any alpha locks you’ve put in place. If you’ve reached your layer limit, go through your layers and see if there are any that you can combine. It’s best to merge layers only after you’re satisfied with what you’ve drawn and know you won’t be changing them.
When multiple layers are merged, the single-layer created will have the name of the layer at the bottom of the merged layers.
What Is Combining Layers?
Merging Layers and combining layers are not the same, we show you the difference too. Combining layers is slightly different from merging layers. Combining layers means merging two or more layers while keeping the exact elements of each layer intact, so, you basically group the layers. You can then edit each layer individually without affecting the other layers.
Combining Layers is useful when you want to create a complex drawing but don’t have enough space on your canvas. For example, you may have a foreground object and a background object that need to be in separate layers to preserve their clarity on screen.
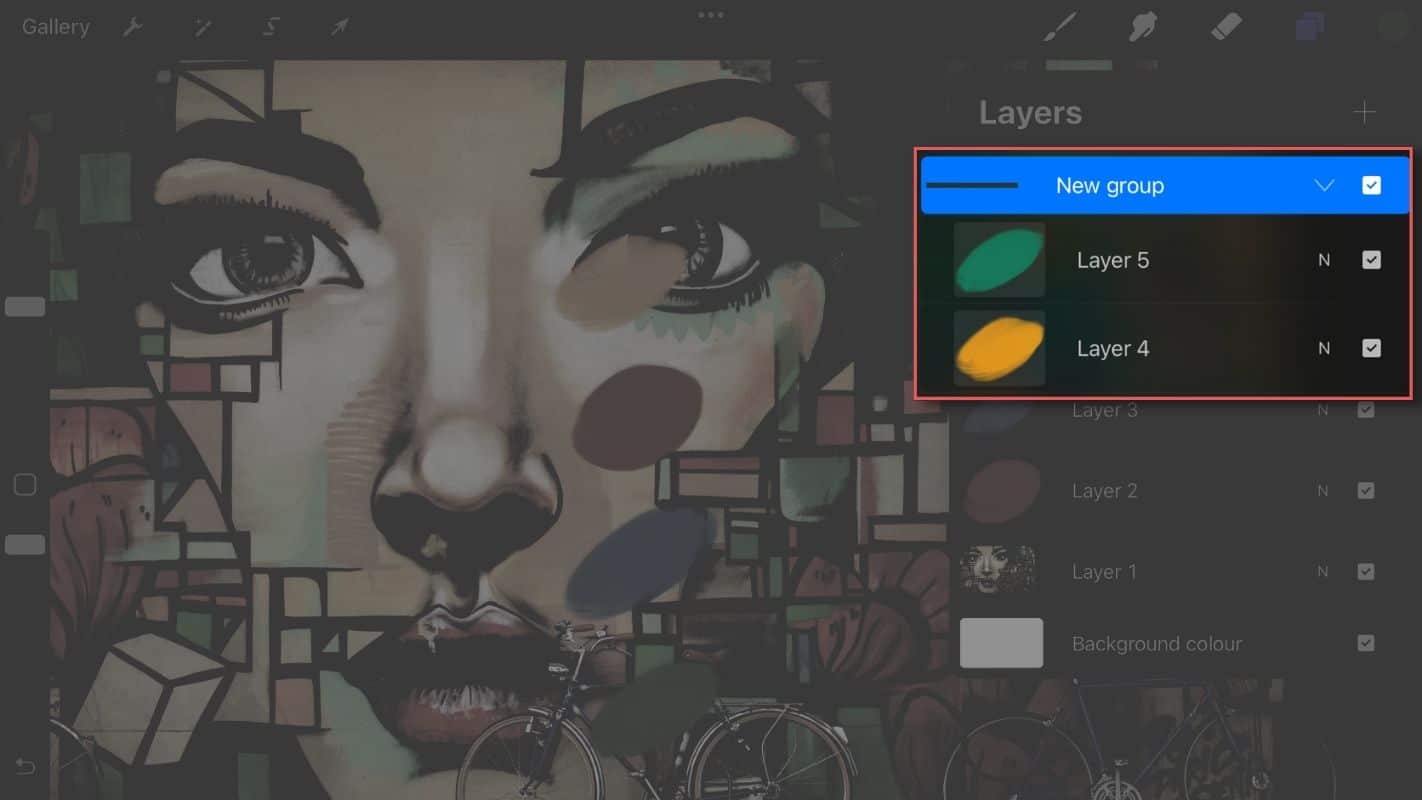
The Combine Down command combines the active layer and the layer immediately below it into a layer group container. Tap a layer in the layers panel to bring up Layer Options, then tap Combine Down. When you use this function on a group that sits directly above another group, your new output will be included in the original one. These commands can also be used to combine two groups or merge layers within the same group with one below them.
How To Merge Layers In Procreate
There are two methods on how to merge layers in Procreate. Merging layers is a straightforward process. With the first option, you have the freedom to merge multiple layers with one gesture. The second method lets you merge your selected layer with the one directly below it. So, how to merge layers in Procreate – Method 1:
- Open the layer panel in the top-right corner
- With your fingers, touch both layers you will merge and pull them together with a simple pinch gesture
- Your layers are merged
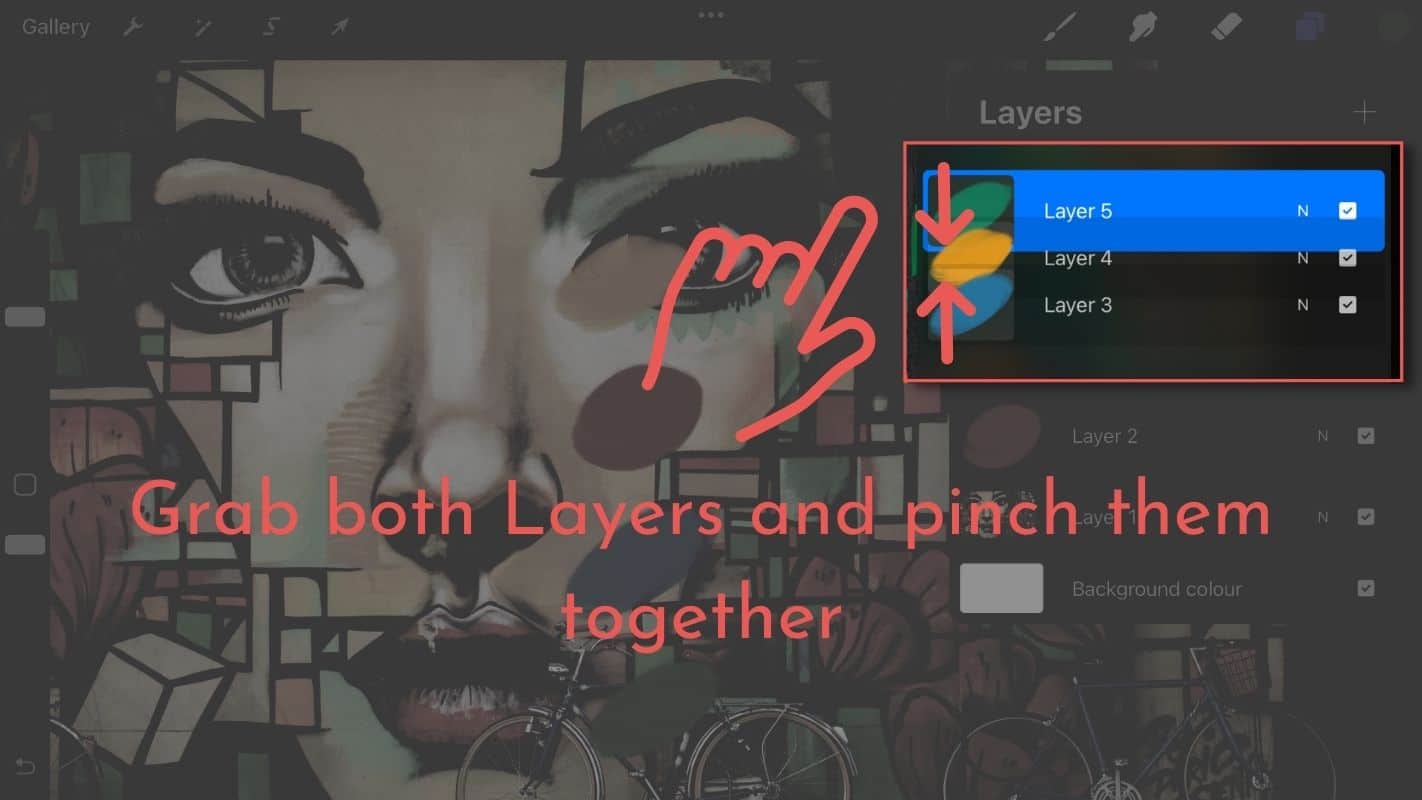
This is how you merge layers with a simple pinch gesture. Let us move on to the second method.
How to merge layers in Procreate – Method 2:
- Click on the layer icon and open the layer panel in the top-right corner
- With your finger or your Apple Pencil, tab on the layer you wish to merge
- A new window pops up, click “merge down”
- Your layer is merged with the one directly below it
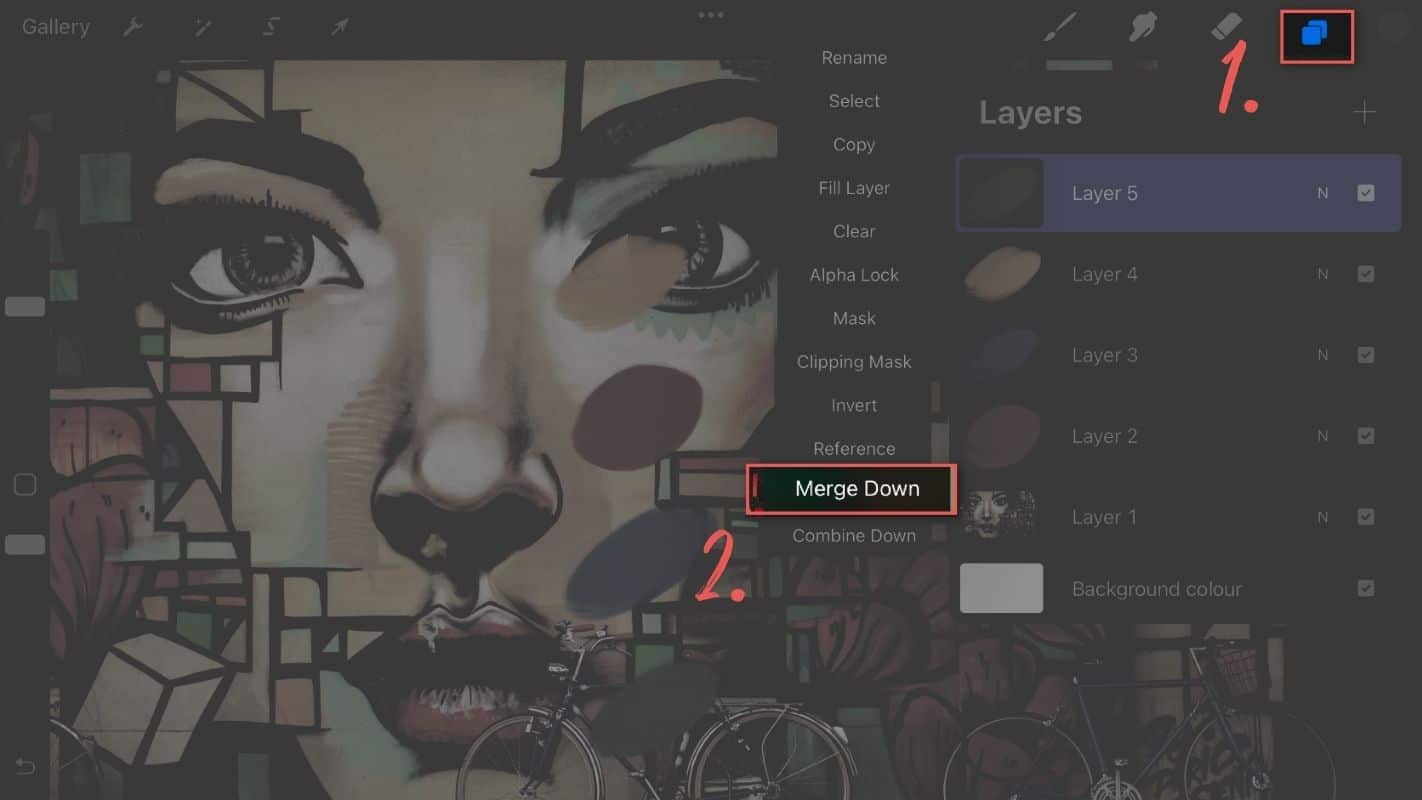
These are the two easy steps to merge layers in Procreate.
What Are Merged Layers In Procreate?
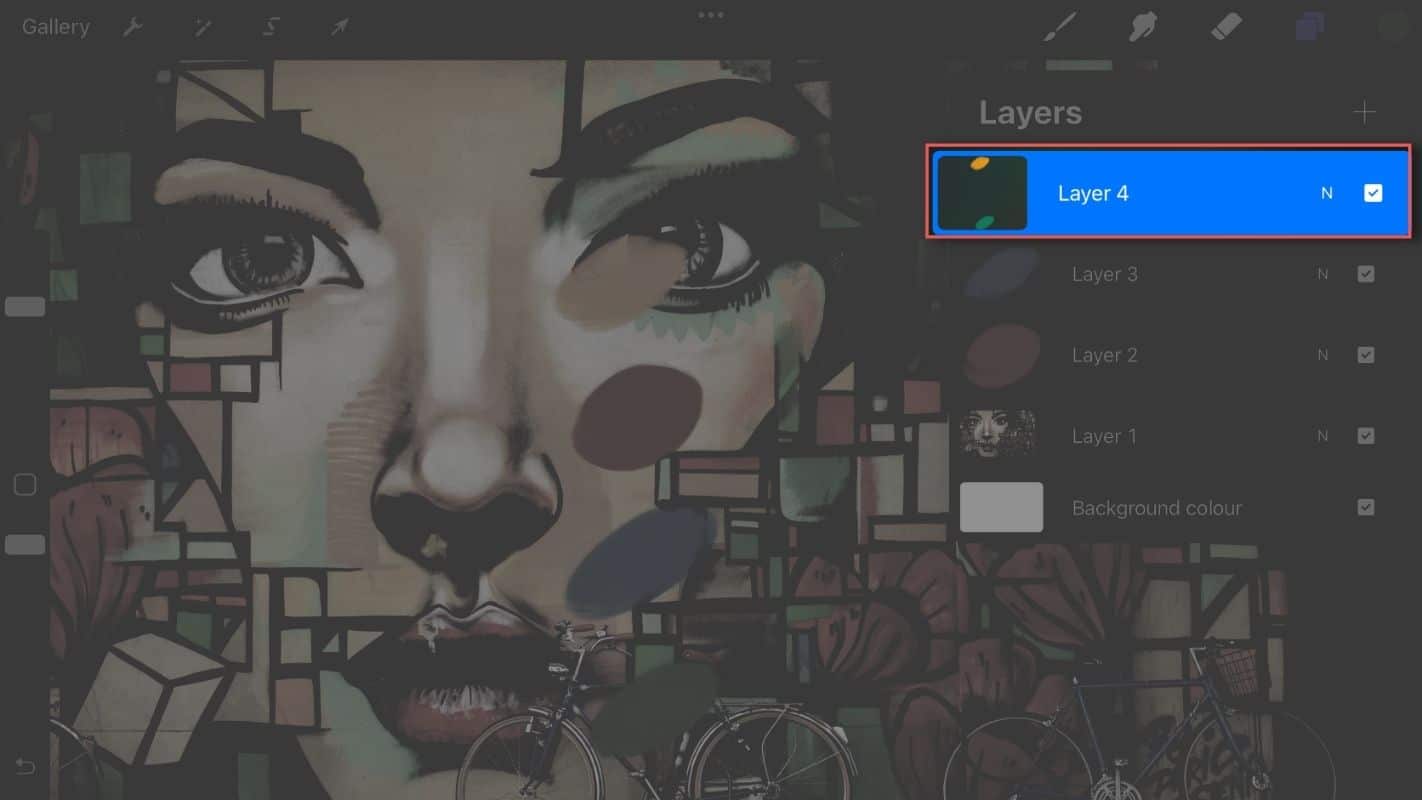
As you can see from the images above, when you merge layers, the layers below the topmost one merge into the new layer below. This new layer is called a “merged layer”. The merged layer is a single layer that contains all of the design elements from the layers below it.
How To Undo Merge Layers In Procreate
Unmerging layers is not yet a feature of Procreate. Unmerging a layer, on the other hand, is as simple as undoing the last action you took. On your iPad’s left screen, tap the return arrow icon. There is no way to undo the merging of layers if you later decide you don’t want them merged. In the future, Procreate is likely to include something.
Other Relevant Features
Animation Assist
If you’re a cartoonist or animator, you’ll love this one. Procreate has an option called “Animation Assist” that speeds up the process of creating keyframes for animation by 30%. Animation Assist is a tool for animators that has a simple but powerful interface. It includes features such as onion-skinning, instant playback, and a visual Timeline. Animation Assist allows you to quickly edit and manage individual frames as well as the entire animation. In a variety of formats, you can share your moving art with the rest of the world.
Alpha Lock
When working with layers, you’ll undoubtedly come across the term alpha lock. Although learning what an alpha lock is and how it works can be confusing at first, it is critical to understand what it is and how it works. Separate layers can have the alpha lock turned on. Any additional drawing or painting on that layer will only affect the existing artwork once it is activated. Outside of this layer, you can no longer draw. Transparent areas will be unaffected. Alpha Lock is ideal for adding texture, detail, or shading to a specific area of your artwork while staying within the lines.
Blending Modes
Blending modes are a feature that allows you to change the way layers interact with each other. The blending mode of a layer can be changed by tapping the blending mode icon at the top of your screen. This will bring up a list of all the different modes you can choose from. Each blending mode has its own unique effect on your artwork. Some modes will make your artwork darker, while others will make it lighter. Some modes will make your artwork more vibrant, while others will dull it down.
Procreate Brush
For any artist, having the right brush for the job is essential. You can choose from a large number of brushes in Procreate. By tapping the brush icon at the top of your screen, you can access the brush menu. This will display a list of all the different brushes available. If that isn’t enough, you can always add new brushes to your iPad.
More Procreate Tutorials
As you navigate through the nuances of Procreate’s features, remember that there’s a whole world of Procreate wisdom to explore. Our comprehensive Procreate tutorials page is your gateway to mastering this versatile app. From beginner-friendly tips to expert-level tricks, we’ve got you covered.
Our main tutorials page is not just a learning resource but a community of Procreate enthusiasts. Here, you’ll find in-depth guides and creative ideas to fuel your passion for digital art. Don’t hesitate to explore and deepen your understanding of Procreate.
Conclusion
Painting and drawing apps are incredibly useful for creating professional artwork. Procreate is no exception. However, the tooltips and tutorials in the app don’t go into the full potential of the app. The more you use it, the more you’ll love it.
Procreate has a ton of drawing options, but combining these options to increase your workflow is where it’s at. By learning how to merge layers in Procreate, you’ll be able to create high-quality work much faster than before.
That’s everything you need to know about how to merge layers in Procreate! Thanks for reading,
Lilly-Mai
More Procreate Tutorials:
Sources:
Share with your Friends:
